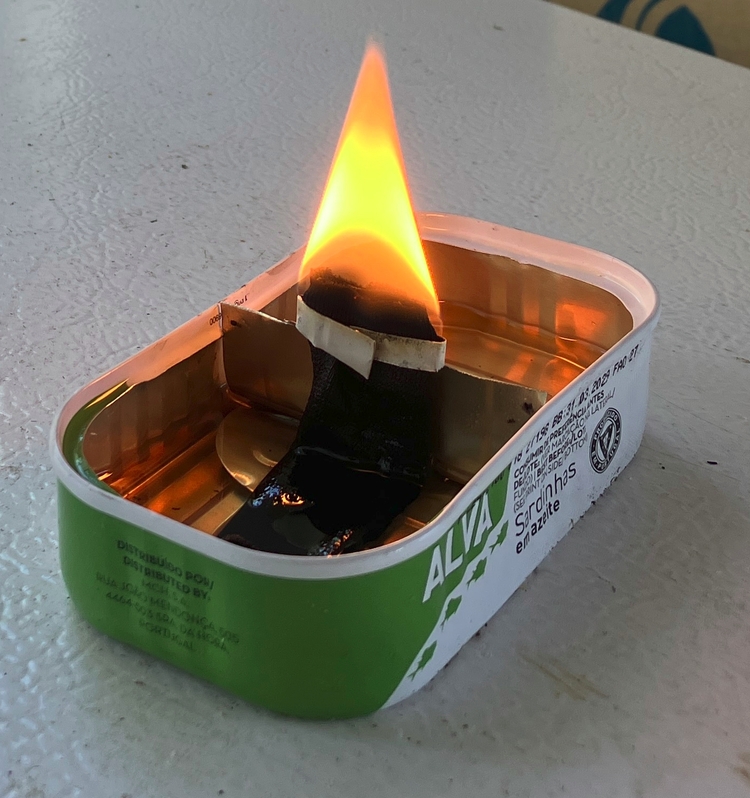
The concept of an oil lamp made out of a sardine tin is nothing new. The idea has been explored by others as a sort of survival lamp, which can be made with very simple materials. However, my design is different in that it’s meant to be used regularly and provide a brighter flame than most DIY oil lamps.
Why use a sardine tin for an oil lamp? Firstly, its shape: vegetable/animal oils are rather thick, which means that they can’t wick up very far and that the oil level must be kept within a narrow range for the lamp to burn cleanly and with a large flame. This favors a shallow but wide oil reservoir, much like a sardine tin. In contrast, lamps fueled with kerosene and other petroleum distillates can have a flame sitting much higher than the fuel reservoir, and the reservoir can be deeper since the lamp is less sensitive to changes in fuel level. Secondly, sardine tins are cheap and readily available. They are made with sheet metal, an easy-to-work yet heat-resistant material.
The oil level of a lamp is important because it controls the amount of fuel delivered to the flame. Too little, and the flame will be too small and the bare wick will be exposed to air, burning it away; too much, and the flame will be sooty because not enough air is available to fully combust all the oil, resulting in incomplete combustion with byproducts like soot and carbon monoxide. Specifically, the oil level controls the amount of liquid oil delivered — but the lamp burns vaporized oil, not liquid oil. For this reason, an overly high oil level will result in too much liquid oil delivered to the flame, which absorbs heat and prevents oil from vaporizing, actually decreasing flame size.
Another factor affecting fuel delivery is wick dimensions. I am using a flat wick, which gives more contact between the flame and air than a round wick, allowing for a larger flame size before it becomes sooty. The thickness of the wick matters: a thicker wick draws up more oil, bringing more fuel to the flame. My wicks were made by folding a piece of cotton over a few times until I had a wick of the desired thickness and width, then sewing the layers together. I found that about 2–4 layers of cotton are appropriate for this lamp.
To construct this lamp, all you need are a sardine can (including the top which will be used as the wick holder), a wick constructed as described above, and some tin snips. Pliers are optional if you don’t want to get your fingers cut up.
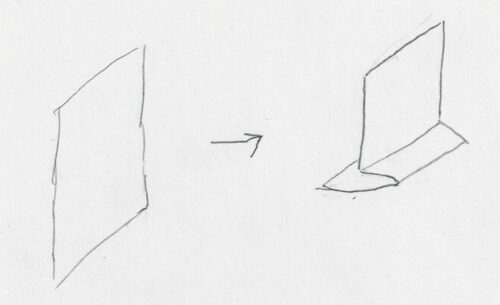
- First, remove the tab from the sardine can lid.
- Next, fold one end of the lid into a base. This will become the wick holder
- With the lid standing up, slide it into place.
- Pinch the sides of the sardine tin against the wick holder to secure it. This may mangle the edges of the wick holder, so straighten them out. When installed, the wick holder should be very secure. It shouldn’t rattle around or fall over even if you shake the tin.
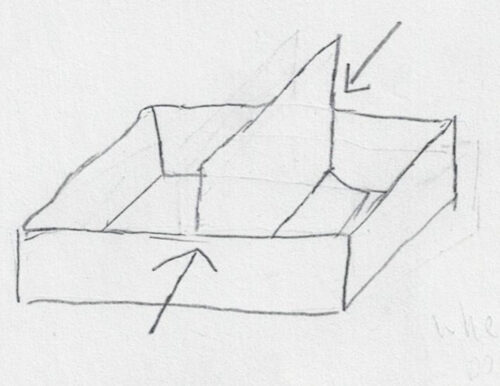
- Mark where the lip of the tin meets the lamp, then make two cuts across the wick holder about 5 mm above this point, one-quarter of the way through its width. (You can remove the wick holder for this step)
- Cut off the rest of the wick holder about 5 mm above the cuts previously made.
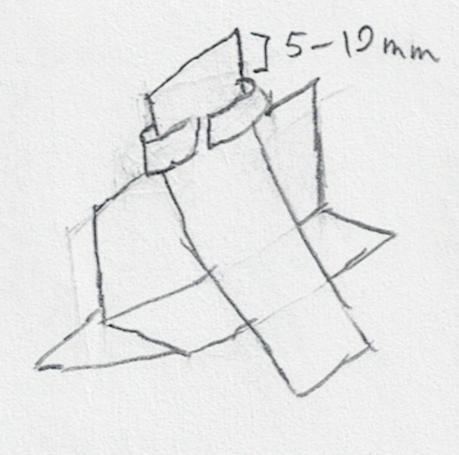
- Wet the wick with oil, then attach it to the wick holder using the two tabs you just cut, leaving 5–10 mm of wick sticking out above the tabs.
- Fill the lamp with oil and use it. Just like a dead-flame kerosene lamp, this lamp works best in places with minimal air movement, so it’s best if you use it indoors. Even a slight breeze makes the flame irregular and sooty.
- You may have to make some adjustments to the lamp. If the flame is too small, use a thicker wick. If it’s sooty, use a thinner one. Also, try adjusting the amount of wick above the wick holder tabs.