This was my science project for the Synopsys Science fair which I participated in in 2023.
Abstract
1.2 billion people worldwide need to boil water to make it drinkable, even in places considered developed. This is because boiling is simple, versatile, and accessible. While water is commonly boiled, it must take in lots of energy to reach its boiling point. After this, the scalding-hot water must then release that energy and cool for between 45 minutes several hours before it is drinkable.
The two opposite steps just outlined lead to a solution: by using a heat exchanger, the boiled water can release its heat energy, which is taken in by the cold water. This cools the boiled water to a drinkable temperature while preheating the cold water so it needs less energy to boil. Two pots, one containing a heating element and another containing a coiled copper tube serving as a heat exchanger were connected to implement this apparatus.
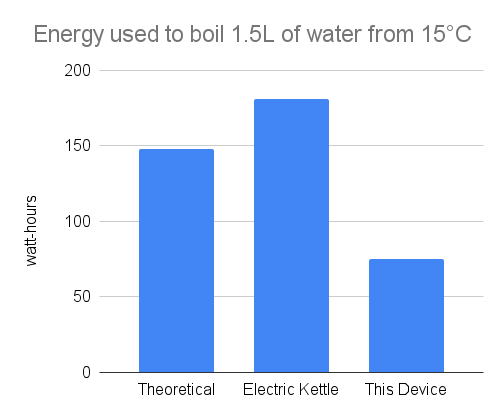
Comparing the results to that of a normal electric kettle, the default way of boiling water for most, this setup led to a reduction of 59% in energy needed to boil 1.5L of water from 181 to 75 wh. Additionally, clean water exiting the heating exchanger was at 35°C.
The heat exchanger more than doubled efficiency of boiling water. Further iterations will reduce cost and size to make this more practical for home use.
Background
Boiling is the primary method of household water purification across the world. At 80% efficiency, the electric kettle is among the most efficient ways to do so. However, that still amounts to a huge amount of energy because of water’s high heat capacity, thus making it energy-intensive to boil. This project seeks to reduce the power needed to heat up water by preheating it with previously boiled water.
Boiling water is an effective way to kill microbes and make it safe to drink. An experiment confirmed that boiling for three minutes in a covered container was enough to inactivate all detectable levels of Bacillus spores, in contrast with other methods like filtration. Its ease and relative safety makes it the first choice the CDC recommends for purifying water in emergencies. Also, boiling requires no consumables aside from fuel, whereas methods like chemical tablets, filters, and even UV bulbs do.
Most electric kettles today automatically shut off through the use of steam triggering the bending of a bimetallic strip, which opens a set of contacts. Since it is the steam, and not the water temperature which is detected, this system works for all altitudes. Steam is always produced, regardless of boiling point, and its temperature is generally enough to trigger the strip at any altitude.
Many tubing materials can be bent, particularly soft metals like copper which are commonly used to carry water. Copper can be machine-bent to a very small bend radius of 1-½ to 2 times the tubing radius if annealed copper is used; however, hand bending can only produce a radius of 4 or 5 times. (In this context hand-bending refers to manually-powered tools, not bending with only one’s hands.)
Procedure
The goal is to produce an automated method of purifying water through boiling that uses a heat exchanger to reduce energy consumption and output water temperature.
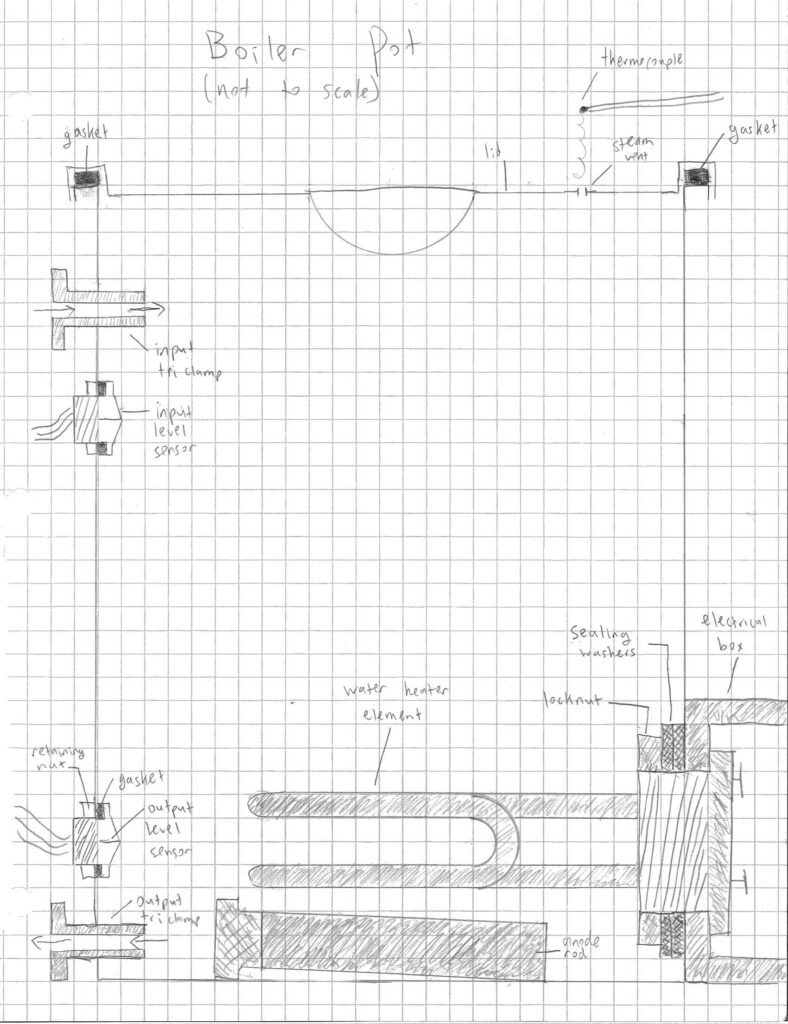
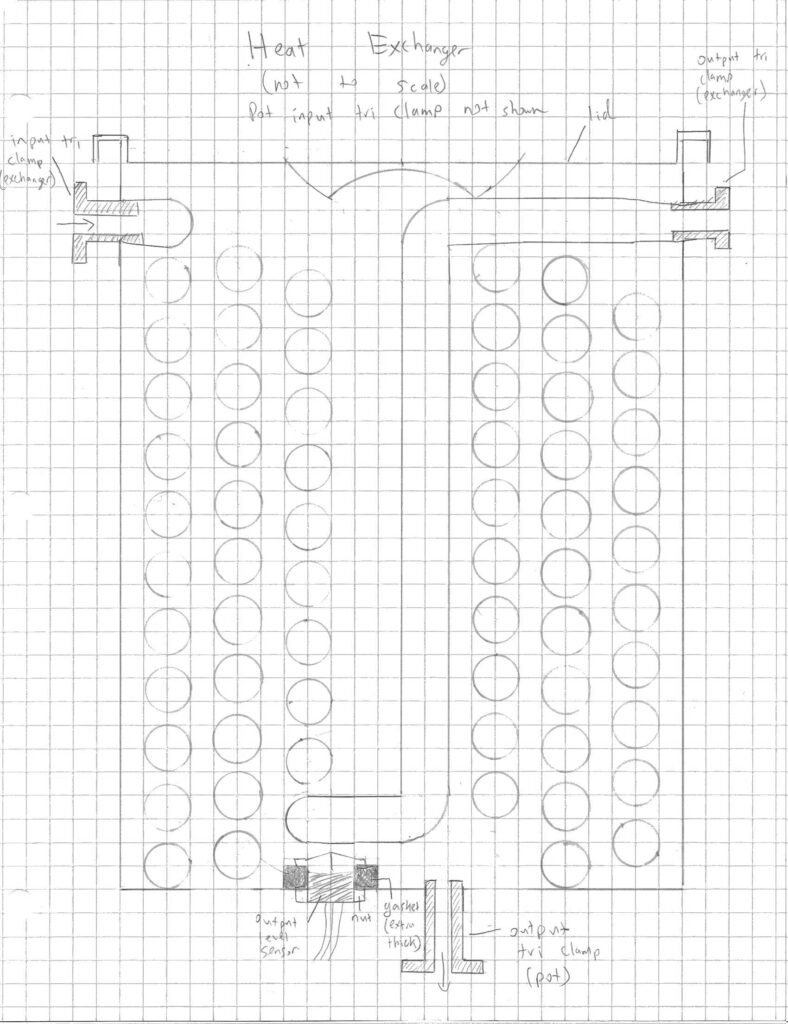
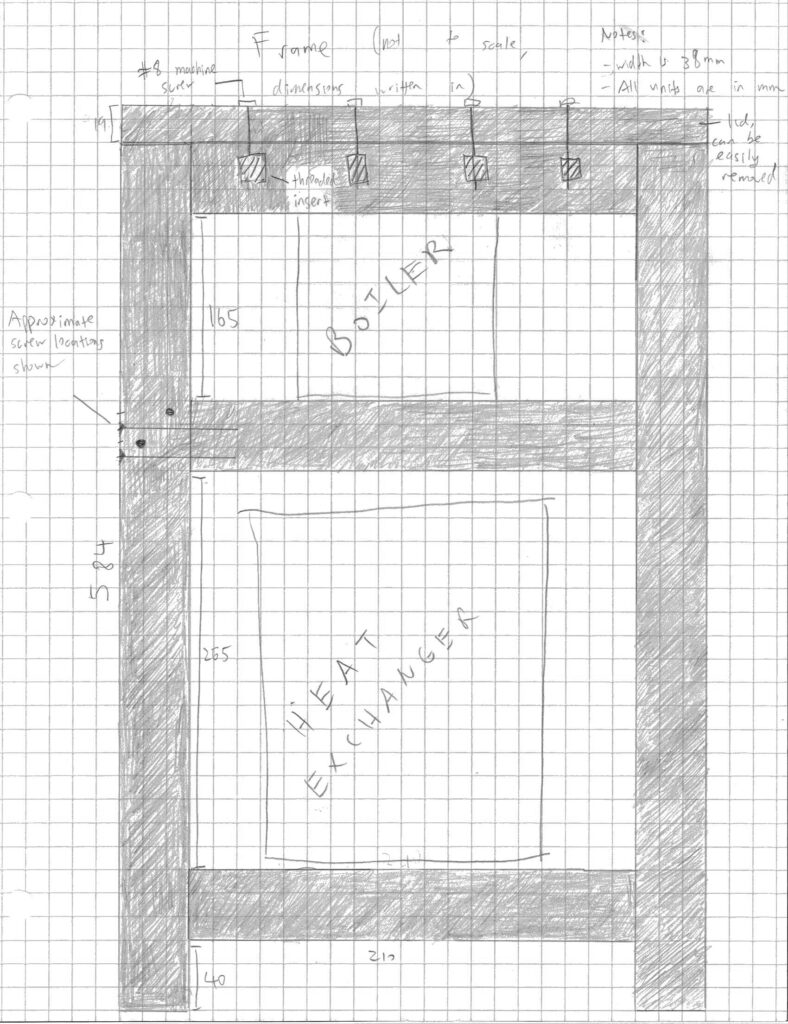
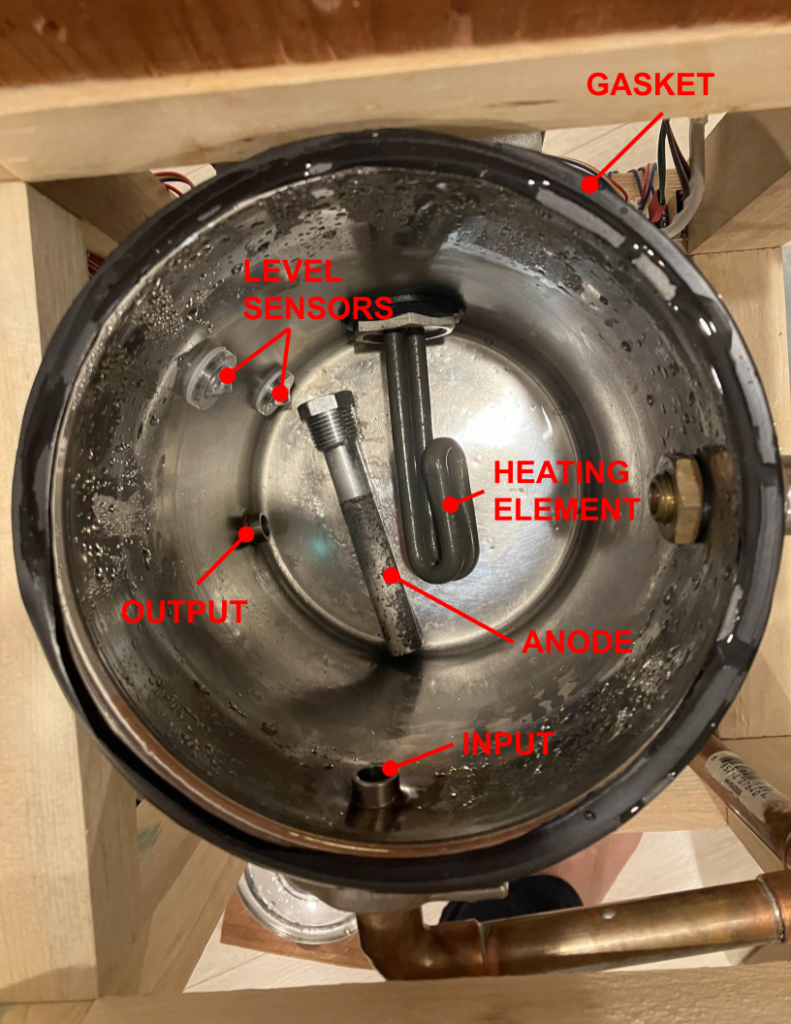
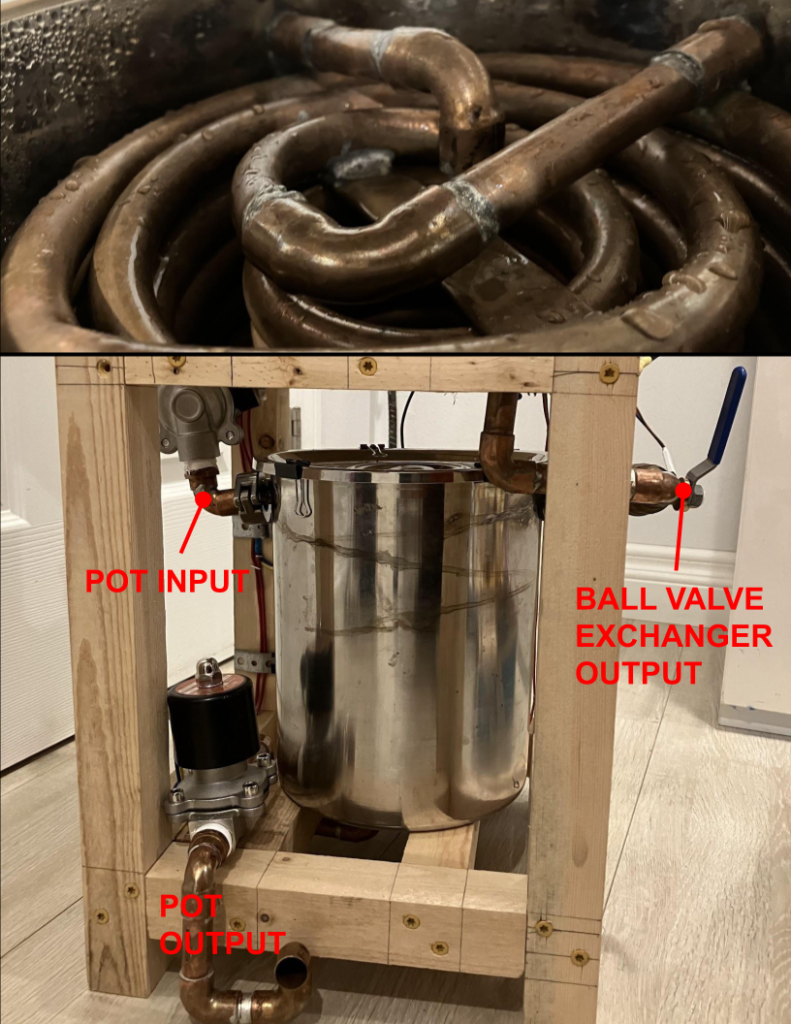
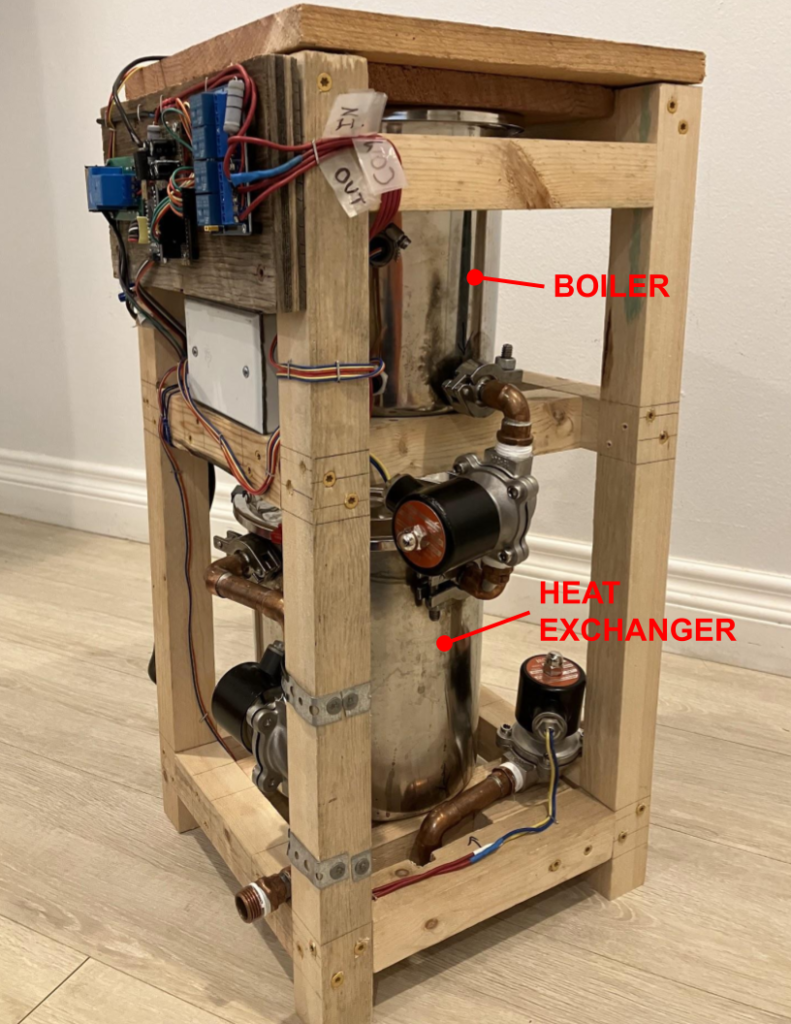
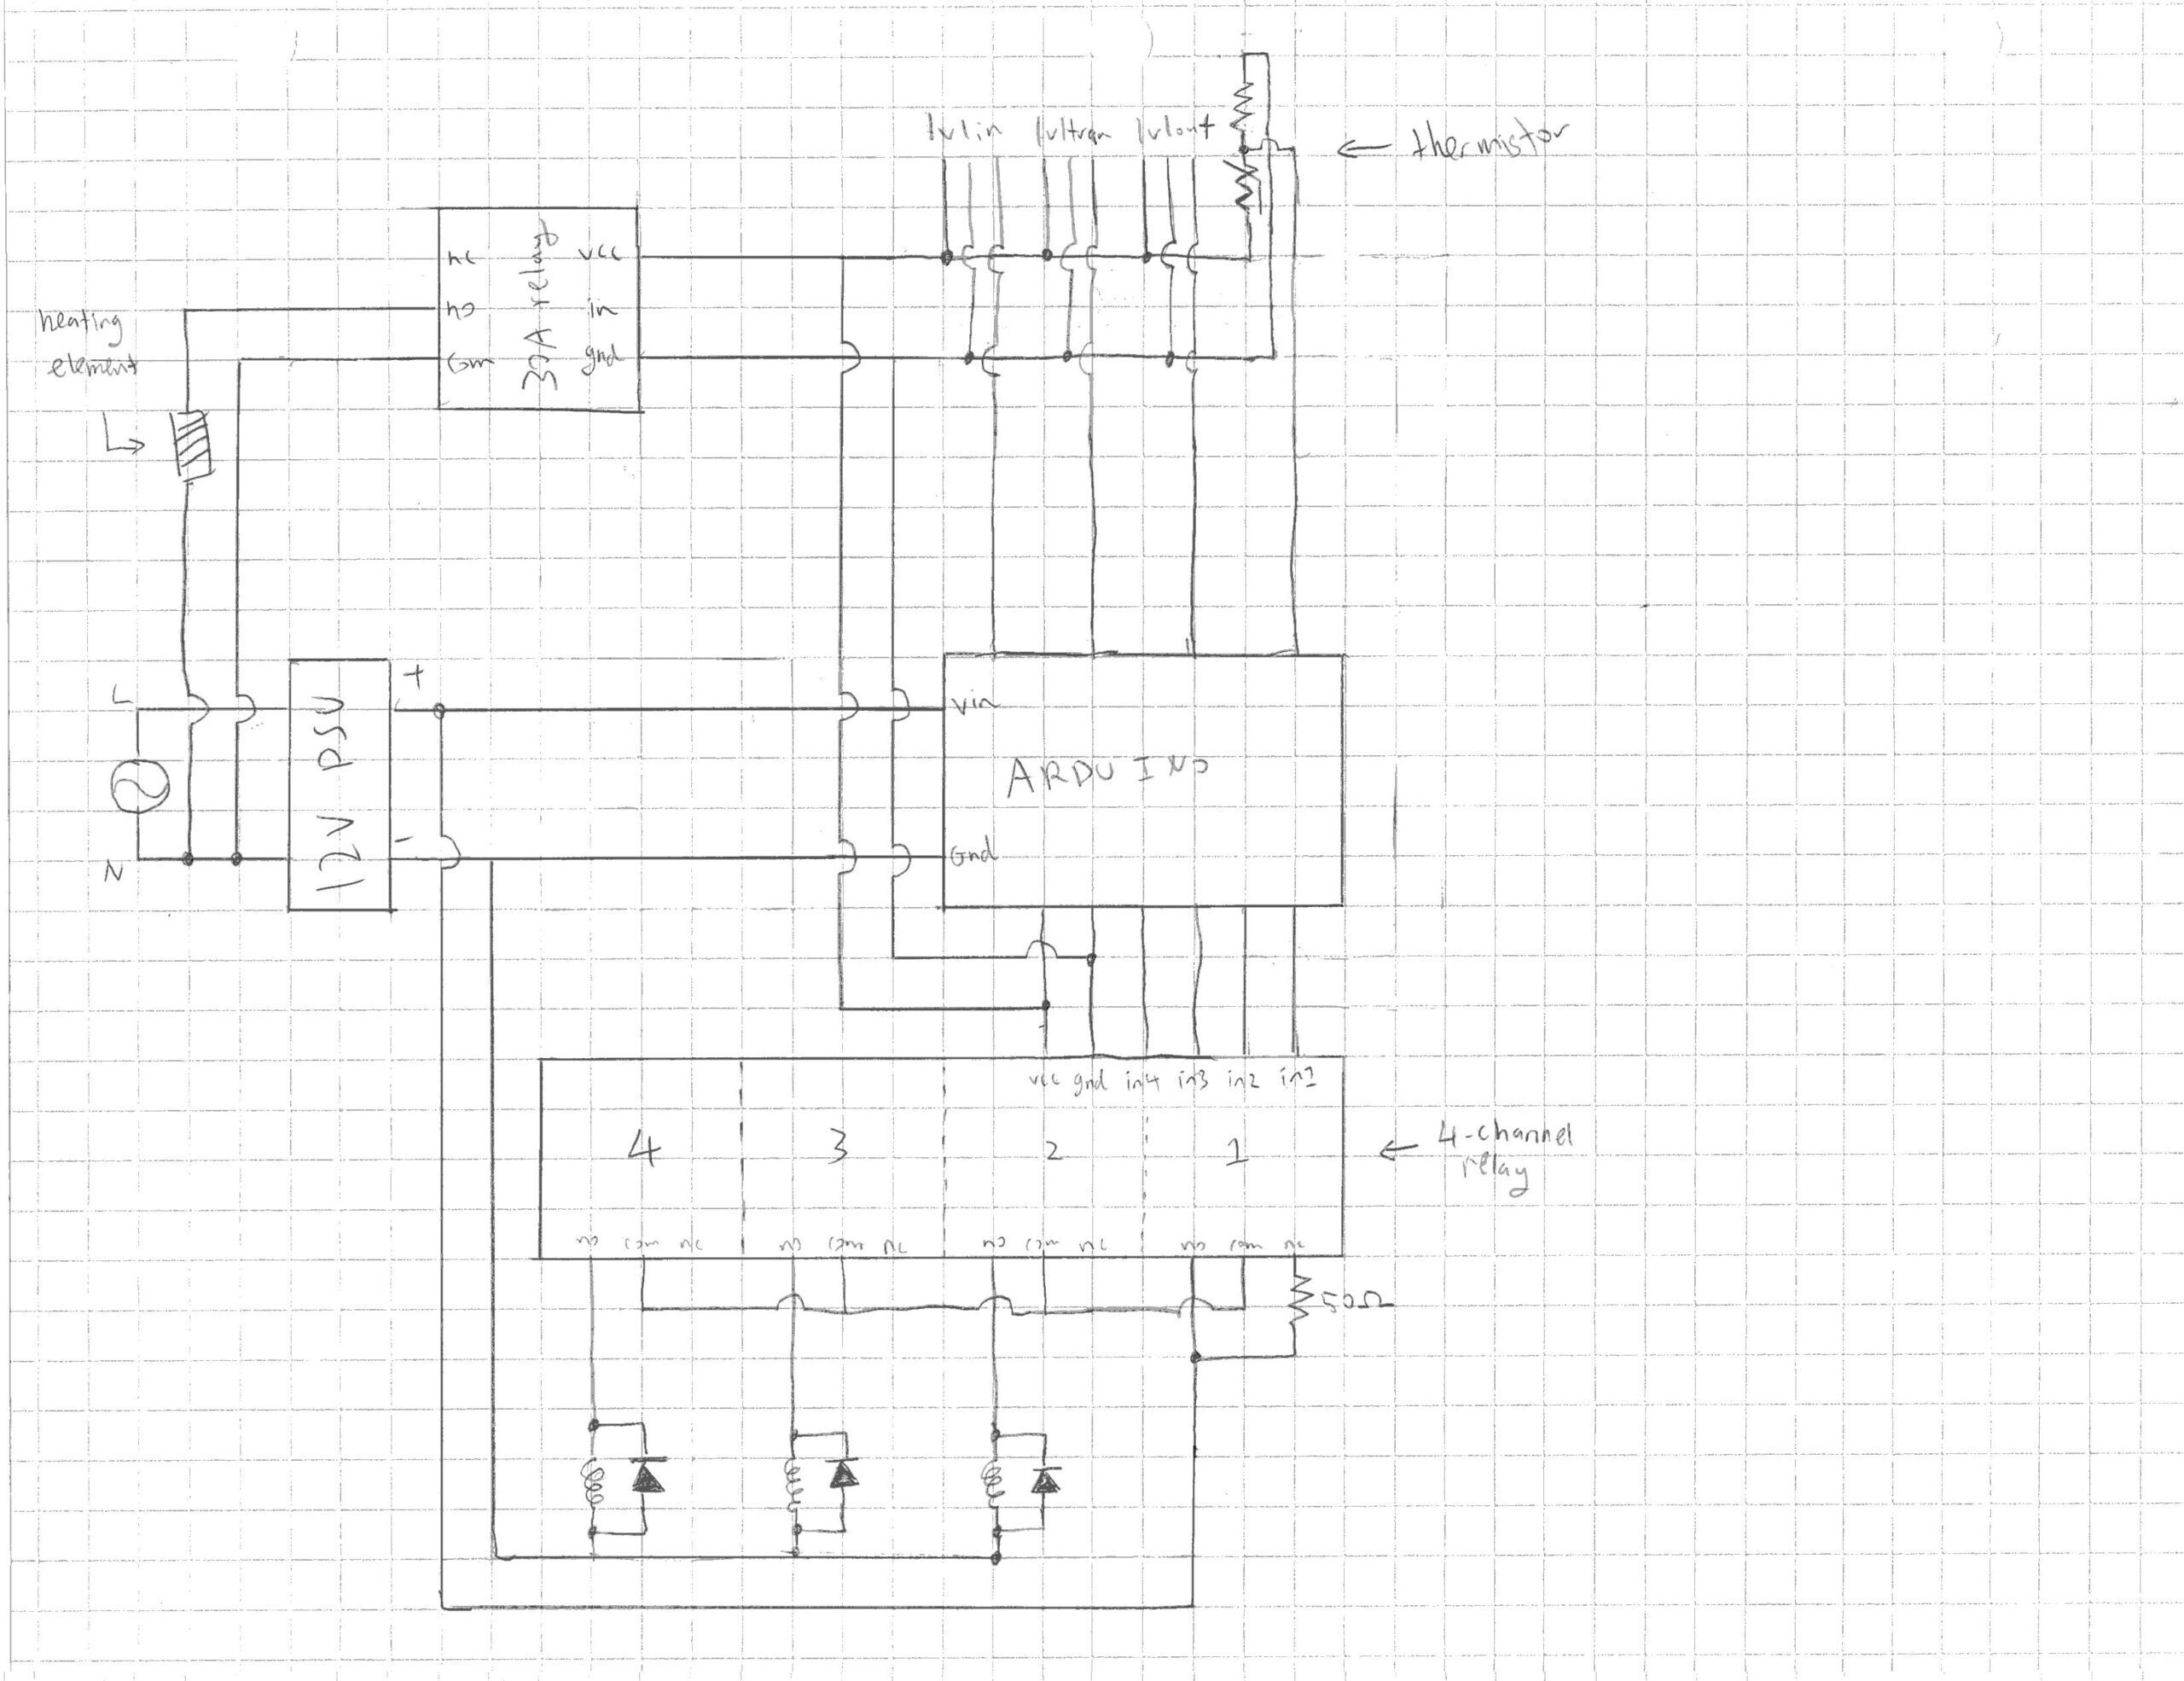
This design has two vessels: the “boiler” which boils and the “heat exchanger” which transfers heat. The boiler is above the heat exchanger so hot water can fall down by gravity. To make the boiler, holes are drilled in a thin-walled stainless steel pot. The heating element, two level sensors, and pipes are then soldered on. The lid is sealed with a rubber gasket. The heat exchanger, a ⅜” coiled copper tube inside another pot, has inlets and outlets for the heat exchanger and pot, as well as a level sensor. The rest of the piping is ½” rigid copper. Water runs through the heat exchanger on its way to the boiler and goes into the heat exchanger pot after boiling. Three solenoid valves are used to control flow in and out of the vessels and a ball valve is used to reduce flow into the boiler. An Arduino Nano controls the solenoid valves and heating element while taking in readings from the level sensors and a thermistor. A wood frame is used to support the vessels, hold the lid on the boiler at pressure, and mount the electronics.
Boiler
Heat Exchanger
Frame
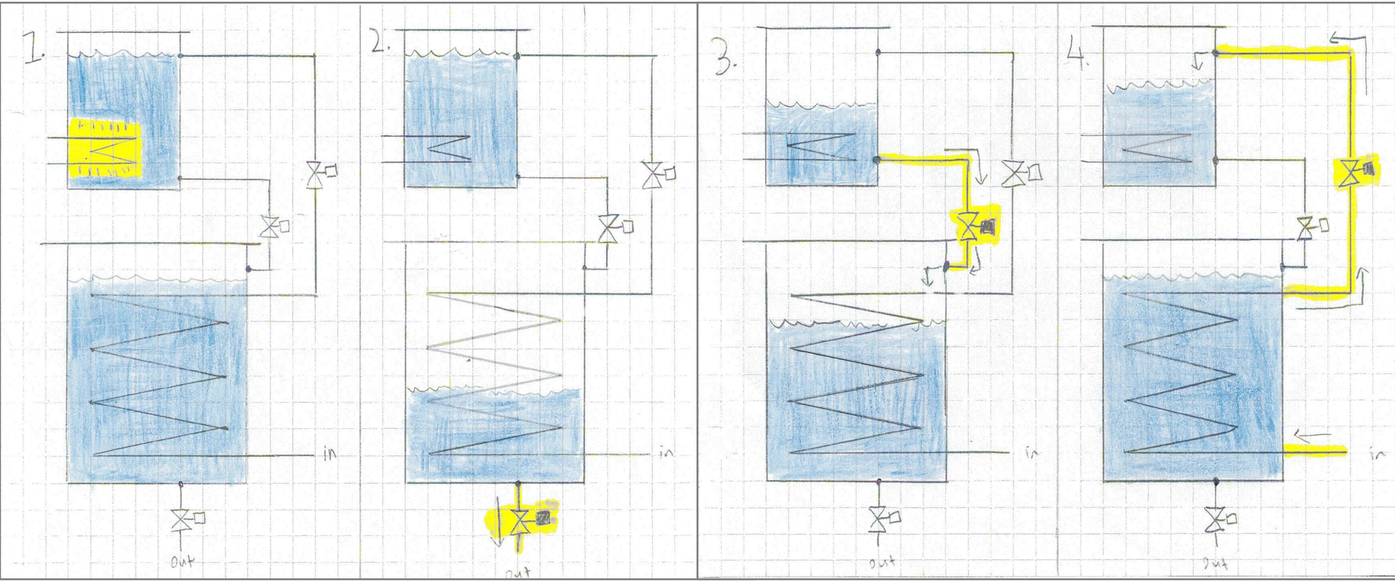
It works in 4 steps:
- The water is heated as heat is transferred between the hot water in the heat exchanger pot and the cold water in its coil.
- After boiling has been detected, the heat exchanger pots drains and cooled, potable water comes out.
- Then, the boiler drains its hot water into the heat exchanger pot.
- Finally, preheated water is forced up through the coil into the boiler. The process starts again.
Results
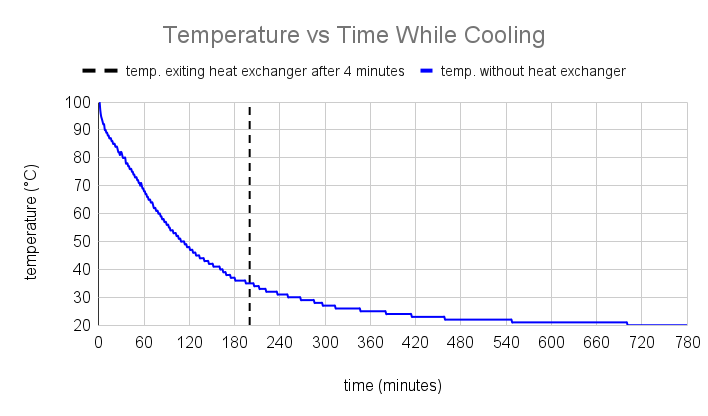
This system was compared against an electric kettle, the default method of boiling water outside of the US. While both heating elements were rated at 1500W, the kettle actually drew 1437W while our element drew 1358W. After both setups were boiled with two pots of water to heat up the kettle body and the heat exchanger, the kettle took 181Wh to boil 1.5L of tap water (measured to be 15°C) while ours took 75Wh, a reduction of 59%. In theory, only this heat exchanger design only allows for a 50% reduction since it heats tap water only halfway to boiling, but other factors like kettle insulation and covering could be at play. In addition, the water left the heat exchanger at 37°C after spending about 4 minutes, which is around the average human body temperature and considered “warm” for most people. Freshly boiled water from the kettle poured into a covered glass container (which is an approximation of how most families store water) cooled to only 94°C in that time.
Future Iterations
The current heat exchanger design requires copper which is expensive, complex to coil, and heavy. Future designs will probably include a pot filled with cold water within another filled with hot water. Water pressure would force the warmed water of the inner pot up into the boiler. Additionally, the heat exchanger’s benefits only appear after boiling three pots of water, in this case, 4.5L. Reducing the boiling capacity may prove to be more efficient for smaller amounts of water, though somewhat slower since draining cycles would have to be more frequent. Increasing the size of the heat exchanger would allow it to go beyond the current theoretical power reduction of 50%. Since the hot water moves downward and the cold water upward, it provides a counter-flow effect that can heat the cold water and cool the hot water more effectively. Finally, the standard steel heating element should be replaced with a stainless one to eliminate the need for the magnesium anode rod, which while effective at preventing corrosion also leaves sediment at the bottom of the boiler.
Materials
All parts in nominal dimensions
BOILER:
- 1x thin-walled stainless steel pot with lid, 3L
- 12 x 12, ⅛” thick rubber sheet
- 1x screw-type water heater element, 120v 1500w, low watt density
- 1x 1 NPT locknut
- 2x 1 NPT rubber sealing washer
- 1x 1-gang ½” holes weatherproof box and lid
- 1x ½ strain relief cable connector for UF cable, metallic
- 1x magnesium anode rod
HEAT EXCHANGER:
- 1x thin-walled stainless steel pot with lid, 6L
- 50ft (about 15m) of soft ⅜ copper tubing
- 4x ⅜ copper coupler, cup x cup
- 3x ⅜ copper elbow, cup x cup
OTHER PLUMBING:
- 1m of hard ½ copper tubing
- 12x ½ copper elbows, cup x cup
- 5x ½ copper street elbows, fitting x cup
- 1x ½ lead-free brass ball valve, cup x cup
- 7x ½ copper adapter, cup x MPT
- ½ FPT to ¾ FHT swivel adapter (if supplying water with garden hose)
- 6x copper bushing, ½ fitting x ⅜ cup
- 6x ½ tri-clamp ferrule
- 3x tri-clamp, gasket, hex nut
- 3x 12v, ½ MPT, stainless steel solenoid valve, direct action
- Solder and flux
- Thread tape
ELECTRONICS:
- 3x optical level sensor, polycarbonate
- 1x thermocouple, 10kΩ with 2kΩ resistor
- 1x GFCI plug, manual reset
- 1m 3-wire, 16 AWG cord
- 1x 12v, 3a wall mount power supply
- 1x 1-channel relay, 30a
- 1x 4-channel relay, 10a
- 1x Arduino nano
- 24 and 18 AWG wire, 16 AWG UF cable
- Dupont jumper cables
- 2x 50Ω, 5W resistor
- 5x 220µF, at least 5v capacitor
- Heat shrinks, different sizes
- Staple gun staples (for low-voltage wire)
- Insulated electronic staples (for high-voltage wire)
- Twist-type wire nuts
- Solder
FRAME:
- 2x 8ft (about 2.5m) 2×2 pine wood
- 1×12 board
- 2 ½” long wood screws
- #8 flush threaded inserts for softwood
- #8 x 2 screw
Tools
Anything used in the making of this apparatus but not included in its final form is considered a tool
- Hand drill
- Twist drill bits
- Step drill bit
- Cutting oil
- Knockout punch (if step bit proves impractical)
- Hole saw
- Standard hand tools like screwdrivers, hex keys, wrenches (crescent and socket), hammers, needle-nose pliers, etc.
- Water heater element wrench
- Hacksaw
- Miter saw (recommended) or hand saw
- Blow torch and striker
- Soldering iron
- Granulated salt (about 3.3kg, does not have to be food grade)
- ABS pipe (smallest mandrel)
- 3D-printed hollow mandrels
- Any method for temporarily connecting ⅜” copper pipe to water supply (we used a ½” vinyl tube that slips over the copper and is locked with a hose clamp)
- Ruler and measuring tape
- Pencil and marker
- Computer to run Arduino IDE
- ICSP programmer (potentially)
Code
//relay pins
int voltPin = 2;
int inPin = 3;
int transPin = 4;
int outPin = 5;
int heatPin = 8;
//sensor pins
int boilFullPin = A3;
int boilEmptyPin = A4;
int exchEmptyPin = A5;
int tempPin = A6;

//threshold variables
int levelThreshold = 1; //voltage BELOW which level sensor is considered tripped
int tempThreshold = 2.5;
unsigned long startTime;

void valveOn(int pin) {
  digitalWrite(voltPin, LOW);
  digitalWrite(pin, LOW);
  delay(100);
  digitalWrite(voltPin, HIGH);
}

void valveOff(int pin) {
  digitalWrite(pin, HIGH);
}

void setup() {
  pinMode(voltPin, OUTPUT);
  pinMode(inPin, OUTPUT);
  pinMode(transPin, OUTPUT);
  pinMode(outPin, OUTPUT);
  pinMode(heatPin, OUTPUT);
  Serial.begin(9600);

  digitalWrite(voltPin, HIGH); //turn off all relays; they trigger low.
  valveOff(inPin); //ensure all valves and heater are turned off
  valveOff(transPin);
  valveOff(outPin);
  digitalWrite(heatPin, LOW); //except for the heater which triggers high.

  if(((analogRead(exchEmptyPin) * 5 )/ 1024.0) < levelThreshold){ //drain heat exchanger, if applicable
    Serial.println("draining exchanger");
    valveOn(outPin);
    while(((analogRead(exchEmptyPin) * 5 )/ 1024.0) < levelThreshold){ //wait until it finishes emptying
      delay(10);
    }
    valveOff(outPin);
  }
  if(((analogRead(boilEmptyPin) * 5 )/ 1024.0) < levelThreshold){ //drain boiler
    Serial.println("draining boiler");
    valveOn(transPin);
    while(((analogRead(boilEmptyPin) * 5 )/ 1024.0) < levelThreshold){ //wait until it finishes emptying
      delay(10);
    }
    valveOff(transPin);
  }
}


void loop() {

  Serial.println("filling boiler");
  valveOn(inPin);
  while(((analogRead(boilFullPin) * 5 )/ 1024.0) > levelThreshold){ //wait until it finishes filling
    delay(10);
  }
  valveOff(inPin);

  startTime = millis();
  digitalWrite(heatPin, HIGH);
  Serial.println("boiling starting");
  while(((analogRead(tempPin) * 5) /1024.0 < tempThreshold) || (millis() - startTime < 30000)){
    delay(10);
  }
  digitalWrite(heatPin, LOW);
  Serial.println("boiling stopped");

  Serial.println("draining exchanger");
  valveOn(outPin);
  while(((analogRead(exchEmptyPin) * 5) / 1024.0) < levelThreshold){ //wait until it finishes emptying
    delay(10);
  }
  delay(5000);
  valveOff(outPin);

  Serial.println("draining boiler");
  valveOn(transPin);
  while(((analogRead(boilEmptyPin) * 5) / 1024.0) < levelThreshold){ //wait until it finishes emptying
    delay(10);
  }
  delay(5000);
  valveOff(transPin);
}
Schematic
Awards
DISCLAIMER: 40–50% OF SYNOPSYS PARTICIPANTS GET SOMETHING. AND NEAR WHERE I LIVE, MECHANICAL ENGINEERING IS NOT A PARTICULARLY COMPETITIVE CATEGORY.
I won the Bruce Kawanami Award (a sponsored award) and an honorable mention for this project.
