Introduction
For the last year or so, I’ve been teaching myself sand casting. My metal of choice up until now has been zinc, because it is cheap and melts easily on a stove. I even built myself an electric stove out of an old air-fryer lid for melting zinc. So far, this has worked pretty well; the stove melts small amounts of zinc pretty quickly. But the stove doesn’t work too well when the weather is too windy, and zinc doesn’t have great mechanical properties: it’s brittle, weak, and dense. Wanting to melt other metals like aluminium and copper alloys (and maybe even cast iron), I decided to build myself a foundry furnace.
Design
My design is based off the measurements of a furnace at my school. I also consulted Ben Baker’sThe Hobbyists’s Guide to Casting Metal, 2nd Edition, the US Navy’s 1958 Foundry Manual, and various online sources.
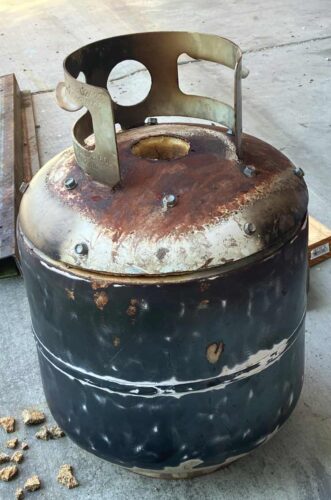
The shell is a propane tank, 310 mm in diameter and 350 mm high. I intend to use this furnace with #8 crucibles, which can safely hold up to 8 kg of metal. The crucible has outside dimensions of 130 mm diameter × 150 mm height, and rests on a base block at most 50 mm high. To give sufficient clearance for the flame and crucible lifting tongs, there is a clearance of 30 mm around the sides and on top of the crucible, leaving enough space for side, bottom, and top lining thicknesses of 60 mm.
The overall dimensions for the cavity are 190 mm ⌀ × 230 mm height, giving a volume of 6.9 L. The Hobbyist’s Guide to Casting Metal recommends a burner of about 100 000–200 000 BTU/hr per cubic feet (1–2 kW per liter) of cavity, so my propane burner of 18 kW should be plenty big.
My furnace’s wall thickness exceeds the 1/4 of cavity diameter recommended by Casting Metal, though because of its small size I wouldn’t say that it has very good insulation. Calculating using the formulas in this file assuming a lining heat conduction of 0.5 W/mK, heating the inside of the furnace up to 1100 °C (roughly the pouring temperature of silicon bronze) would bring outside of the furnace to 400 °C (around the melting point of zinc) and 1.0 kW of heat would be lost on the sides by convection and radiation, to say nothing of the energy escaping from the vent hole, through the top and bottom, or used to melt the metal. Heating the furnace to 1350 °C (cast iron) results in an outside temperature of 450 °C with a heat loss through the sides of 1.3 kW, while heating to 730 °C (aluminium) results in an outside temperature of 310 °C and heat loss of 0.6 kW. Given the chance to re-do this furnace, I would probably decrease the cavity size to fit a #6 crucible, or line the furnace with ceramic wool, which is more insulating.
The Shell
Following the recommendation of the 1958 Navy Foundry Manual, I procured a thick steel shell for the furnace, an empty propane tank (which is a common shell for DIY furnaces). After venting the tiny amount of gas still left in the tank, I removed the valve with considerable difficulty. Neither a pipe wrench, nor an adjustable wrench, nor a strap wrench, nor channel locks, nor a small pair of vise grips could get the valve off, so I eventually settled on hitting the valve off using a steel rod (a long 3/4″ bolt) and a 4 lb sledge hammer. To purge whatever gas remained (to avoid a situation like this) before cutting off the top with an angle grinder, I filled the tank to the brim with water.
To cut the exhaust and burner holes in the propane tank, I used a fiberglass cut-off wheel on a Dremel, making small, straight cuts to rough out the round shape. It is generally recommended to not attempt to cut a round hole using such tools, due to the curvature of the cut warping and potentially breaking the blade. Aside from being quite inefficient, this method worked well enough, and a bit of cleaning-up with a file made the holes reasonably smooth. The drain hole (to allow molten metal to flow out instead of flooding the furnace) was drilled using a step drill.

I also stripped the paint from the shell using an angle grinder with a paint-stripper wheel. Since its speed rating was a little lower than the angle grinder’s maximum speed, I used my phase-fired controller to reduce the angle grinder speed.
The Lining
Attempt 1: Backyard Clay
As a lining material, I at first wanted to use what I could get for free: wild clay from my backyard, mixed with sawdust obtained from a local makerspace as a temper and pore-forming agent. I’d tried making some bricks with various ratios of sawdust and clay with good results; they didn’t crack even when dried in the sun, and pit fired to become light but reasonably strong. The clay was purified by this method, then mixed at a ratio of 1 part clay slip to 1 part sawdust by volume. By measuring the weights of equal volumes of sawdust and clay slip before and after dehydrating, I determined that this amounts to a mixture that contains (by weight) 13 parts sawdust, 87 parts dry clay, and 120 parts water. The sawdust-clay was dried to a plastic consistency in the sun, mixed around a bit with my feet, and applied by hand to the inside of the propane tank, without the use of a form for the cavity.
I hadn’t bothered to measure the shrinkage of this sawdust-clay mixture, but I’d assumed it would be small enough that I could simply allow the lining to shrink away from the shell by a little bit and fill the gap with something like sand. As it turned out, it shrank away from the shell by over 10 mm on each side (though it stayed in one piece), making this clearly impractical. The sawdust, rather than increasing porosity and decreasing drying shrinkage, probably increased the tensile strength of the clay to give it its crack resistance, which I wrongly equated to low shrinkage. Also, because the lining shrank so much, I was able to remove it from the shell without any damage, revealing numerous large voids caused by my poor forming technique.
It is possible to produce clay refractories based on bentonite clay (a similar type to my backyard’s “smectic” clay) by combining it with very large proportions of other refractory materials (usually various alumina or silica minerals), so that the final mixture is only about 5–10% clay. To make the mixture reasonably strong and plastic, it is necessary for this other “stuff” to be very fine — ordinary silica sand will not do — but such materials are quite expensive and not readily-available, so I decided to try something else.


Attempt 2: Fireclay
A very common material in home-made refractories is fireclay, a sort of low-shrinkage, high temperature-resistance clay mined from very deep pits. A local clay supplier carried 50-lb bags of this for about $15, so I got a bag.
The Hobbyist’s Guide to Casting Metal goes into great detail about ceramic furnace linings, mentioning such subjects as phase diagrams and particle sizes for ceramics. Although the ingredients for his recommended recipes for ceramic-based refractory were out of my reach, he did include in the appendix some data for clay-sand refractory mixtures that I thought I might try out. In particular, one recipe called for 1 part clay, 1 part sand, and 8 parts shredded foam (by volume, I’d assume). Since it was easier for me to use sawdust (though Baker recommends against this since it has some shrinkage of its own), I tried mixing up recipes with a sawdust:clay:sand ratio of 4:1:1, 2:1:1, and 1:1:1. The 4:1:1 mixture was not plastic enough to work by hand; and the 2:1:1 and 1:1:1 mixtures could be formed satisfactorily by ramming. Based off the fact that a pit-fired specimen of 2:1:1 refractory was extremely crumbly, I chose to use the 1:1:1 mixture for my foundry.
Ramming it in place requiring a form for the furnace cavity, which made out of rolled corrugated cardboard. To make the form easier to remove from the rammed lining, I made it in 2 parts — a thick inside to provide structural support, and a thin outside piece with a glossy coating which could be easily peeled away. In my first attempt ramming the lining, the form was not rigid enough and began to collapse, creating a misshapen cavity with uneven lining thickness, though the 2-part design worked perfectly. For my second attempt I used more rolled-up cardboard to fill the inside piece very tightly, allowing it to hold its shape. Aside from just having more “stuff” as structural support, I think that filling the inside of the form created some tension in the outside part, making it more resistant to the compressive force applied by ramming the lining, conceptually similar to why pressurized soda cans are so much stronger than opened ones.


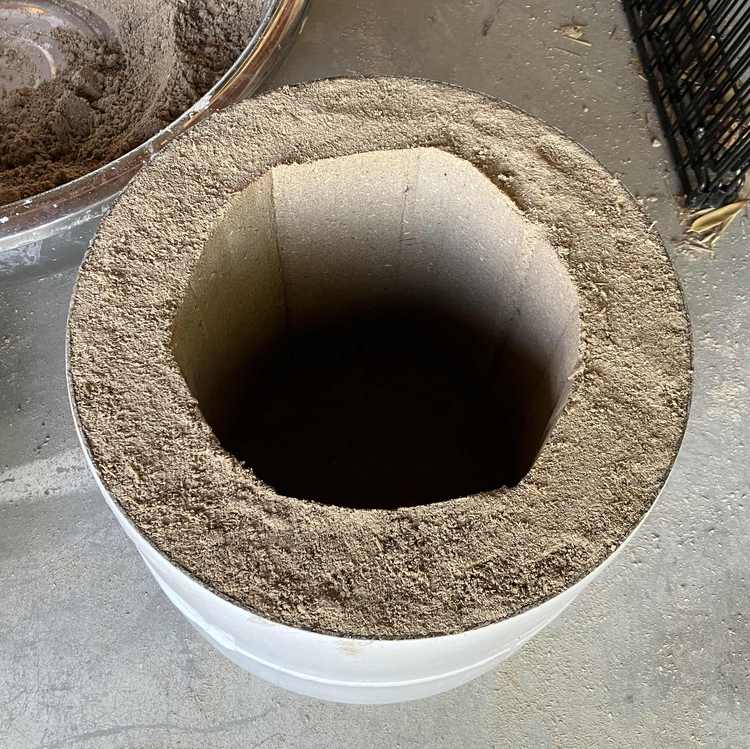
For the lid, I needed some way to keep the lining from falling out. I initially tried screwing six screws inwards from the edge, ramming the lid up with a single piece rolled up piece of cardboard to form the vent hole. Although the lining didn’t crack around the screws (as might happen if its shrinkage was too high), I could feel it moving around slightly when shaking the lid. After shaking it around a lot, the lining finally broke off. For the second iteration, I added another 6 screws, and used some some thin steel wire (obtained by unwinding a piece of wire rope; I didn’t have anything else) strung between the screws to better hold the lining in place.
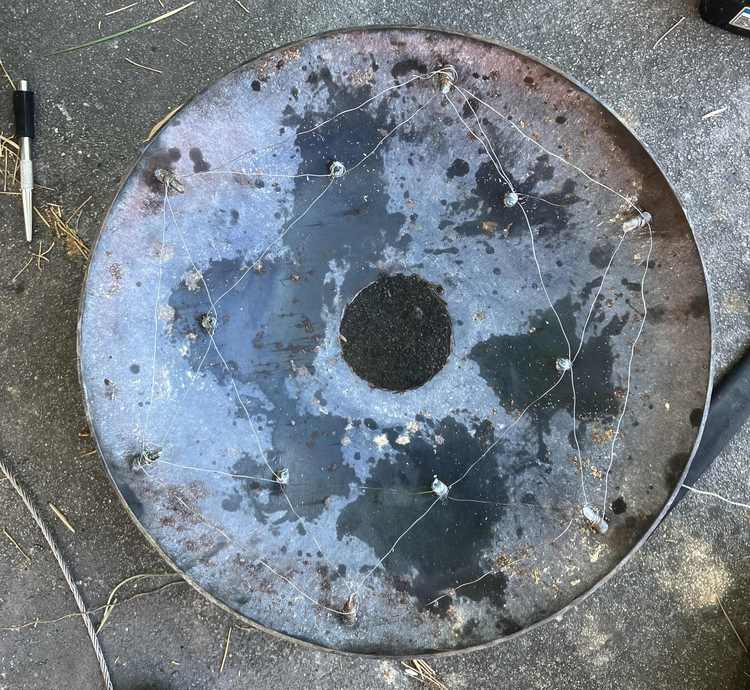

Thinking that the sawdust-clay refractory wouldn’t be strong enough to resist bumps and scrapes, I also tried applying a 5 mm thick “hot face” to the exposed surfaces of the furnace and lid, consisting of a 1:1 mixture of fireclay and sand. Unfortunately, since I allowed the lining to dry before applying the hotface, it simply shrank away from the lining. Still, I did my best to get the hotface to stick to the bottom of the furnace cavity, to create a flat surface for the crucible plinth to sit on; and to the lid, because I was afraid the sawdust-clay would crumble at the interface between the furnace and lid.


Firing the lining
Since I wasn’t able to put the whole furnace in a kiln, the next best thing was to fire the lining from the inside out using my propane burner. The burner hole formed a bit of a flare, so I could just put the end of the burner pipe in. To begin with, I turned the burner on a very low setting, slowly heating the furnace to a red heat to burn off the sawdust, which took about 4–5 hours. The whole operation consumed very little fuel, and copious amounts of smoke came from the furnace. After this initial firing stage, the lining turned a sort of pinkish-tan color, and had a texture similar to my pit-fired fireclay specimens. (It’d be preferable to fire the furnace all in one operation, but I had to leave the house and couldn’t have the burner unattended.)
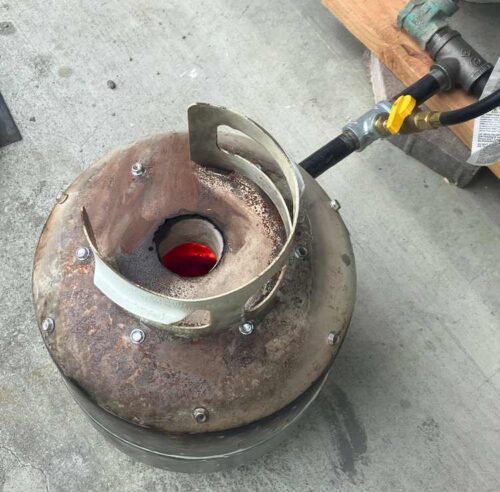
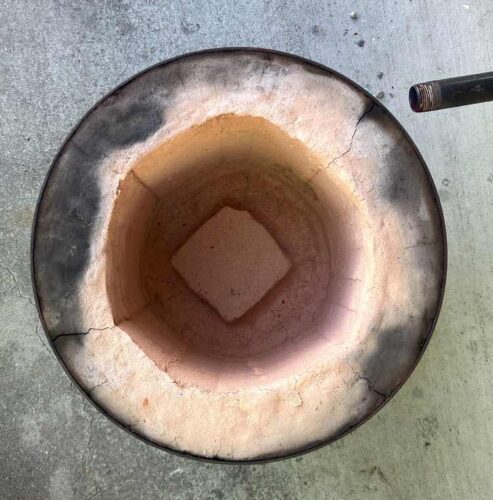
After about a week, I completed the rest of the firing, again heating the furnace slowly. I found it difficult to judge the proper air-fuel ratio with the furnace fully heated, since the incandescent glow completely overwhelmed the appearance of the flame, and the best I could do was listen for the “roar” of the furnace and watch for flames shooting out of the vent hole. (The Foundry Manual also recommends putting a piece of wood or zinc into the furnace to watch it oxidize, though I haven’t tried this yet.) With the fuel valve set to about a 45-degree angle, the burner was able to heat the furnace to a bright yellow heat, indicating a temperature of about 1300 °C. Based on Wikipedia’s pyrometric cone chart, I’d say this corresponds to about cone 10, though my furnace’s fast heating rate (in comparison to pottery kilns) might make for a lower “heat work”, and thus lower cone value.
Anyways, after firing, the inside of the lining was extensively vitrified, making it much stronger than I expected, even the sawdust-clay portions. If I had to make another furnace, I’d definitely be confident using a 4:1:1 sawdust:clay:sand ratio, if my ramming technique could compress it adequately. Adding a hotface was definitely unnecesary with a 1:1:1 lining; although a few pieces of the lid’s hotface got loose or fell off, I am not at all concerned about the lid’s durability. Also, although a lot of cracks appeared in the furnace due to firing shrinkage and uneven thermal expansion, I’m pretty confident they won’t affect the overall safety of the furnace.
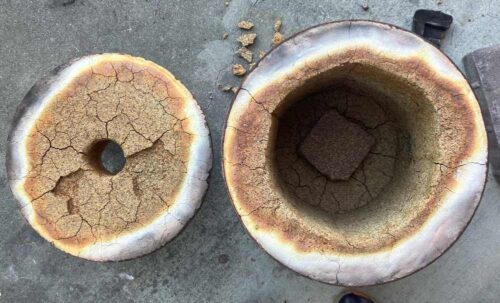
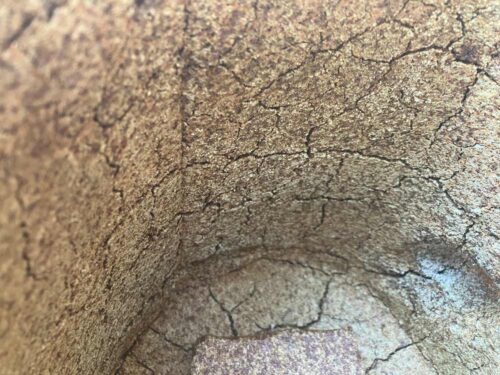
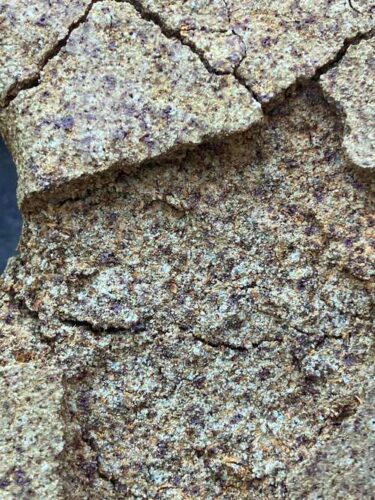


The fireclay I used was “Lincoln 60”, which apparently has a lower temperature tolerance than other fireclays. According to this site, it vitrifies fully at cone 9 and begins to thermally decompose at cone 10, so I might have over-fired my furnace a little. At any rate, no bloating (caused by trapped gases from thermal decomposition) occurred, probably because the sawdust made the clay more porous.
Finally, the very end of my steel burner pipe got a little melted, though the rest of the pipe didn’t overheat due to the cooling effect of airflow through it.
Things I’d Change
In conclusion — these are the things I’d change about my furnace
- Use a smaller crucible and make the furnace walls thicker
- Apply the hotface while the lining is still wet, and adhere it using some clay slip
- Put more sawdust in the lining mixture (possibly using finer sawdust to make the mixture more plastic)
- Weld/braze/screw a burner support pipe to the shell, so I don’t have to balance the burner on a few bricks.
